
Tables as nested lists
Working with tables
Part 4 introduced tables represented as lists of lists. Here we will use that data shape to traverse rows, columns and regions. The following list of rows represents this table:
| Name | Age | Height |
|---|---|---|
| Betty | 10 | 1.37 |
| Peter | 7 | 1.25 |
| Emily | 32 | 1.64 |
| Alan | 39 | 1.78 |
However, only you as the creator of the data knows that row[0] is the name, row[1] is the age, and row[2] is the height, as these are not stored in the list of lists itself.
Since a table is a list containing lists, the individual elements within the table can be accessed using consecutive square brackets. The first index refers to the row, and the second to the column. Indexing starts from zero, so for example my_table[0][1] refers to the second item on the first row.
my_table = [["Betty", 10, 1.37], ["Peter", 7, 1.25], ["Emily", 32, 1.64], ["Alan", 39, 1.78]]
print(my_table[0][1])
my_table[1][0] = "John"
print(my_table)10 [["Betty", 10, 1.37], ["John", 7, 1.25], ["Emily", 32, 1.64], ["Alan", 39, 1.78]]
Like any other list, the rows of the table can be traversed with a for loop. The following code prints out each row of the table on a separate line:
my_table = [[1, 2, 3], [4, 5, 6], [7, 8, 9]]

for row in my_table:
print(row)[1, 2, 3] [4, 5, 6] [7, 8, 9]
Likewise, nested loops can be used to access the individual elements. The following code prints out each element in the table on a separate line with the help of two for loops:
my_table = [[1, 2, 3], [4, 5, 6], [7, 8, 9]]

for row in my_table:
    print("a new row")
    for element in row:
print(element)a new row 1 2 3 a new row 4 5 6 a new row 7 8 9
Visualising code containing lists within lists
Programs containing lists within lists can feel hard to grasp at first. The visualisation tool from Python Tutor is a great help in understanding how they work. The following is a visualisation of the example above:
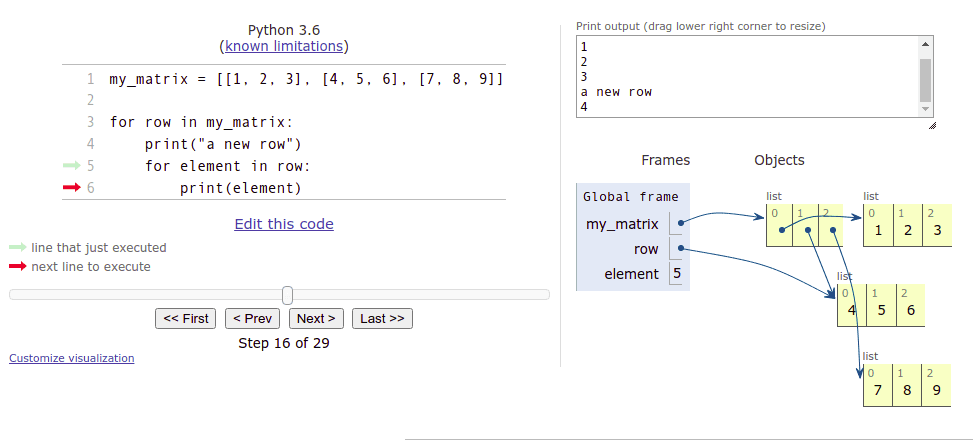
The image above reveals that a 3 by 3 table technically consists of four lists. The first list represents the entire table. The three remaining lists are items in the first list, and represent the rows.
As multidimensional lists can be traversed with nested loops, it would be natural to think of the lists themselves as nested, but the image above shows us this isn't actually so. Instead, the list representing the whole table "points" to each individual list representing a row in the table.
In the image above the execution has progressed to the second row of the table, and this list is what the variable row currently refers to. The variable element contains the element the execution is currently at. The value stored in element is the middle item in the list, i.e. 5.
Accessing items in a table
Accessing a single row within a table is simple - just choose the desired row. The following function calculates the sum of the elements on a chosen row:
def sum_of_row(my_table, row_no: int):
    # choose the desired row from within the table
    row = my_table[row_no]
    row_sum = 0
    for item in row:
        row_sum += item

    return row_sum

m = [[4, 2, 3, 2], [9, 1, 12, 11], [7, 8, 9, 5], [2, 9, 15, 1]]

my_sum = sum_of_row(m, 1)
print(my_sum) # prints out 33 (which equals 9 + 1 + 12 + 11)
Working with columns within a table is slightly more complicated, as the table is stored by rows:
def sum_of_column(my_table, column_no: int):
    # go through each row and select the item at the chosen position
    column_sum = 0
    for row in my_table:
        column_sum += row[column_no]

    return column_sum

m = [[4, 2, 3, 2], [9, 1, 12, 11], [7, 8, 9, 5], [2, 9, 15, 1]]

my_sum = sum_of_column(m, 2)
print(my_sum) # prints out 39 (which equals 3 + 12 + 9 + 15)
The column handled here consists of the elements at index 2 on each row.
The visualisation tool is definitely recommended for understanding how these functions work.
Changing the value of a single element within the table is simple: choose a row within the table, and then a column within the row:
def change_value(my_table, row_no: int, column_no: int, new_value: int):
    # choose the desired row
    row = my_table[row_no]
    # select the correct item within the row
    row[column_no] = new_value

m = [[4, 2, 3, 2], [9, 1, 12, 11], [7, 8, 9, 5], [2, 9, 15, 1]]

print(m)
change_value(m, 2, 3, 1000)
print(m)[[4, 2, 3, 2], [9, 1, 12, 11], [7, 8, 9, 5], [2, 9, 15, 1]] [[4, 2, 3, 2], [9, 1, 12, 11], [7, 8, 9, 1000], [2, 9, 15, 1]]
Notice how above we used the indexes of the row and column to access a chosen element. If we want to change the contents of the table, we have to access the elements by their indexes. This means that we can't use a simple for item in list loop to traverse the table if we want to change the contents of the table.
Instead, we will have to keep track of the indexes of the elements, for example with a while loop, or a for loop using the range function. The following code increases the value of each element in the table by one:
m = [[1,2,3], [4,5,6], [7,8,9]]

for i in range(len(m)): # using the number of rows in the table
    for j in range(len(m[i])): # using the number of items on each row
        m[i][j] += 1

print(m)[[2, 3, 4], [5, 6, 7], [8, 9, 10]]
The outer loop goes through indexes from zero to the length of the table, that is, the number of rows in the table. The inner loop goes through indexes from zero to the length of each row within the table.
A two-dimensional array as a data structure in a game
A table can be a very useful data structure in many different games. For example, the grid of a sudoku game in the image below
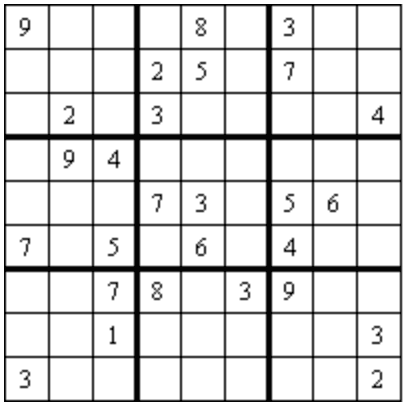
can be represented in table form like so:
sudoku = [
  [9, 0, 0, 0, 8, 0, 3, 0, 0],
  [0, 0, 0, 2, 5, 0, 7, 0, 0],
  [0, 2, 0, 3, 0, 0, 0, 0, 4],
  [0, 9, 4, 0, 0, 0, 0, 0, 0],
  [0, 0, 0, 7, 3, 0, 5, 6, 0],
  [7, 0, 5, 0, 6, 0, 4, 0, 0],
  [0, 0, 7, 8, 0, 3, 9, 0, 0],
  [0, 0, 1, 0, 0, 0, 0, 0, 3],
  [3, 0, 0, 0, 0, 0, 0, 0, 2]
]
Here the value zero represents an empty square, as zero is not an acceptable value in a finished sudoku puzzle.
Here is a simple function for printing out the above sudoku grid:
def print_grid(sudoku):
    for row in sudoku:
        for square in row:
            if square > 0:
                print(f" {square}", end="")
            else:
                print(" _", end="")
        print()

print_grid(sudoku)
The printout should look like this::
 9 _ _ _ 8 _ 3 _ _
 _ _ _ 2 5 _ 7 _ _
 _ 2 _ 3 _ _ _ _ 4
 _ 9 4 _ _ _ _ _ _
 _ _ _ 7 3 _ 5 6 _
 7 _ 5 _ 6 _ 4 _ _
 _ _ 7 8 _ 3 9 _ _
 _ _ 1 _ _ _ _ _ 3
 3 _ _ _ _ _ _ _ 2
Any common game with a gameboard layout can be modelled in a similar fashion. Among others, chess, Minesweeper, Battleship or Mastermind are all based on a two-dimensional grid. For sudoku, it is natural to use numbers to represent the game state, but for other games, different methods may be better.
Consolidation: Sudoku traversals
The next four exercises deliberately revisit the same grid from different directions. This repetition is useful if indexing and nested loops are not yet fluent. Exercises 05-04 to 05-06 practise the individual traversals independently; 05-07 then combines them.
You can check your current points from the blue blob in the bottom-right corner of the page.